
Introduction
Are you ready to deploy your Python Flask application with the power duo - Gunicorn and Nginx? In this step-by-step guide, we will explore the seamless integration of Gunicorn as the WSGI server and Nginx as the reverse proxy and static file server. Elevate your web application's performance and security with this easy deployment process.
Prerequisites
Before we start the deployment process, let's make sure you have the essentials:
- A Linux server (we recommend the reliableUbuntu 24.04 LTS)
- A PC or Laptop to remotely control your Linux server
- A domain name pointing to your server
Meet Gunicorn: Your WSGI Server:
What is Gunicorn?
Gunicorn, or Green Unicorn, is a Python WSGI HTTP server designed to handle web requests efficiently. It's a crucial component for deploying Flask applications, ensuring they run smoothly and easily handle concurrent requests.
How Gunicorn Enhances Your Flask App?
Gunicorn excels in managing multiple connections concurrently, making it an ideal choice for serving your Flask app. Its asynchronous worker model and simple configuration make it a powerful tool for optimizing your application's performance.
Nginx: Your Trusty Sidekick
What is Nginx?
Nginx, pronounced 'engine-x,' is a high-performance web server and reverse proxy server. It's renowned for its speed, scalability, and efficient handling of static content. In our deployment, Nginx acts as the gateway, managing incoming requests and distributing them to Gunicorn.
What role does Nginx play in a deployment setup?
Nginx serves as a gateway in a deployment setup, managing incoming requests and distributing them to Gunicorn. It goes beyond a typical web server, excelling at load balancing, SSL termination, and handling static assets, enhancing the robustness and security of the application.
Step 1: Connect to Your Linux Server
Now that we've met our deployment superheroes let's connect to your Linux server and commence the deployment journey. Buckle up; it's going to be an exciting ride!
ssh your_username@your_server_ipStep 2: Install Packages (if required)
sudo apt install nginx
sudo apt install python
sudo apt install python3-pip
sudo apt install unzip
Step 3: Transferring your project from a local Windows machine to a remote Linux server
Here's a step-by-step guide:
-
Prepare Your Project Folder:
Compress your project folder into a zip file using any compression software like WinZip or Winrar. Ensure that all the necessary files and directories are included in the zip archive. -
Access Command Prompt:
Open the Command Prompt on your local Windows machine. You can do this by searching for "cmd" in the Start menu. -
Navigate to Project Zip File:
Use the `cd` command to navigate to the directory where your project zip file is located. For example:cd C:\Path\To\Your\Project
Copy Zip File to Remote Server:
Utilize the `scp` command to securely copy the zip file to your Linux remote server.
The syntax is as follows:
scp -P Source_File_Path Destination_PathReplace the placeholders with your specific details. Here's an example:
scp -P project_file.zip [email protected]
This command copies the zip file ("project_file.zip") to the specified user's home directory on the remote server with the IP address "214.72.44.19".
-
Provide Authentication:
Enter the password or provide the necessary authentication details when prompted. This ensures a secure transfer. -
Verify Successful Copy:
Once the transfer is complete, you should see a confirmation message indicating that the file has been copied successfully. -
Unzip the Copied Project:
Once the file is transferred, remotely unzip the project using the `unzip` command on the server.unzip project_file.zip
Step 4: Prepare Your Flask App
Ensure your Flask app is ready for deployment. Install necessary dependencies and activate the virtual environment.
sudo pip install virtualenv Create virtual environment:
cd /path/to/your/project_folder
virtualenv venv
Activate virtual environment:
source venv/bin/activateInstall Dependencies:
pip install flaskNow lets Install Gunicorn:
pip install gunicornDeactivate virtual environment using the `deactivate` command:
deactivateMy project folder structure so far:
project_folder
        |____static
               |___style.css
        |____templates
                |___index.html
        |____ app.py
        |____ venv
In my case code of project_folder/app.py
from flask import Flask, render_template

app = Flask(__name__)

@app.route('/')
def index():
    return render_template('index.html')

if __name__ == '__main__':
    app.run(debug=False,host='0.0.0.0')
Note: In your case the flask application code can be anything you like.
Step 5: Create a Systemd Service for Gunicorn
Create a systemd service file to manage Gunicorn as a background service.
The syntax is as follows:
sudo nano /etc/systemd/system/your_app_name.serviceReplace the placeholders with your specific details. Here's an example:
sudo nano /etc/systemd/system/discoveringcs.servicePaste the following content, adjusting the placeholders:
The syntax is as follows:
[Unit]
Description=Gunicorn instance to serve your_app_name
After=network.target

[Service]
WorkingDirectory=/path/to/your/app
Environment="PATH=/path/to/your/app/venv/bin"
ExecStart=/path/to/your/project/venv/bin/gunicorn -w 4 --bind unix:/path/to/your/project/app.sock app:app

[Install]
WantedBy=multi-user.target
This version uses a Unix socket (`--bind unix:/path/to/your/app/app.sock`) instead of a network address. Ensure to replace the placeholders with your actual information.
[Unit]
Description=Gunicorn instance to serve discoveringcs
After=network.target

[Service]
WorkingDirectory=/home/abdullah/project_folder
Environment="PATH=/home/abdullah/project_folder/venv/bin"
ExecStart=/home/abdullah/project_folder/venv/bin/gunicorn -w 4 --bind unix:/home/abdullah/project_folder/discoveringcs.sock app:app

[Install]
WantedBy=multi-user.target
After saving the systemd service file, you can follow the same steps to enable and start the service:
The syntax is as follows:
sudo systemctl enable your_app_name
sudo systemctl start your_app_name
Replace the placeholders with your specific details. Here's an example:
sudo systemctl enable discoveringcs
sudo systemctl start discoveringcs
Step 6: Setup Firewall
sudo ufw enable
sudo ufw status
sudo ufw allow ssh
sudo ufw allow http
sudo ufw allow https
sudo ufw allow 'Nginx Full'
Step 7: Configure Nginx
Create an Nginx server block configuration file.
The syntax is as follows:
sudo nano /etc/nginx/sites-available/your_app_nameReplace the placeholders with your specific details. Here's an example:
sudo nano /etc/nginx/sites-available/discoveringcsInsert the following configuration, adjusting the placeholders:
The syntax is as follows:
server {
    listen 80;
    server_name your_domain_or_ip;

    location / {
        include proxy_params;
        proxy_pass http://unix:/path/to/your/project/app.sock;
    }
    location /static {
        alias /path/to/your/app/static;
    }

}
Replace the placeholders with your specific details. Here's an example:
server {
    listen 80;
    server_name discoveringcs.com www.discoveringcs.com;

    location / {
        include proxy_params;
        proxy_pass http://unix:/home/abdullah/project_folder/discoveringcs.sock;
    }
    location /static {
        alias /home/abdullah/project_folder/static;
    }

}
Make sure to replace placeholders like `your_domain_or_ip` and `/path/to/your/project/` and `/path/to/your/app/` with your actual information.
Then create a symbolic link to this configuration file in the `sites-enabled` directory:
The command syntax is as follows:
sudo ln -s /etc/nginx/sites-available/your_app_name /etc/nginx/sites-enabledReplace the placeholders with your specific details. Here's an example command:
sudo ln -s /etc/nginx/sites-available/discoveringcs /etc/nginx/sites-enabledRemove the default Nginx server block if it exists.
sudo rm /etc/nginx/sites-enabled/defaultAfterward, test the Nginx configuration and restart Nginx
sudo nginx -t
sudo systemctl restart nginx
Step 8: Point Your Domain
-
Login to Your Domain Provider's Website:
- Go to the website of your domain provider.
- Log in with your account credentials.
-
Navigate to DNS Management or Manage DNS:
- Look for a section named "DNS Management," "Manage DNS," or similar. This is where you can configure your domain's DNS settings.
-
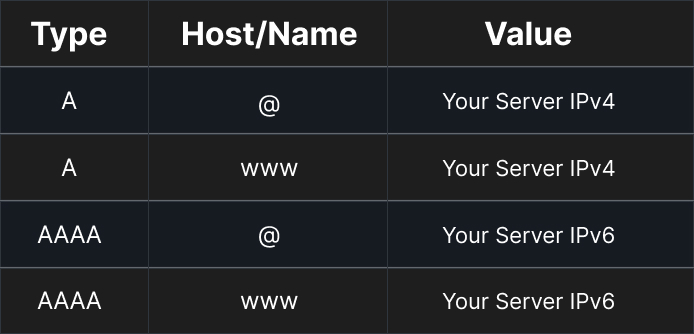
Add the following Records:
Step 9: Secure Your Deployment with Let's Encrypt (Optional)
Ensure your deployment is secure by obtaining an SSL certificate with Let's Encrypt.
The command syntax is as follows:
sudo apt install certbot python3-certbot-nginx -y
sudo certbot --nginx -d your_domain
Replace the placeholders with your specific details. Here's an example command:
sudo apt install certbot python3-certbot-nginx -y
sudo certbot --nginx -d discoveringcs.com www.discoveringcs.com
Step 10: Celebrate Your Success!
Congratulations! Your Python Flask app is now live, powered by Gunicorn and Nginx. Access it through discoveringcs.com, and revel in the successful deployment.
Feel free to revisit this guide whenever you need to update or expand your application. Happy coding and deploying!
Comments by Readers:
Abu Huzaifa
This blog is very helpful for me.